

Instructions for installing and configuring the Google Maps application
Thank you! Your submission has been received!
Oops! Something went wrong while submitting the form.


Plan business trips, courier deliveries, create routes using Google Maps directly in Bitrix24, or simply track all your customers on the map.
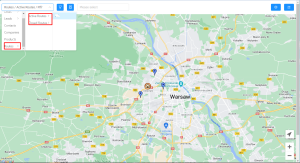
This guide is intended for Bitrix24 customers and describes:
If you encounter difficulties obtaining a token, we recommend contacting support: cloud.bitrix24.pl
1. INSTALLATION AND BASIC START-UP
1.1 Installing the application
Install the application from the Bitrix24 Marketplace: https://www.bitrix24.com/apps/app/supportpl_sp_z_oo.maps_mobile/
When opening it for the first time, set the starting point:
Enter your company’s address — this address will be the starting point for all routes.
1.2. Setting up
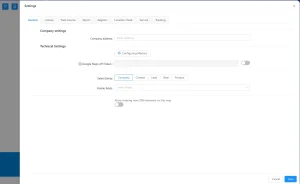
When you launch the app for the first time, you’ll need to fill in all the fields on the screen:
1) Enter your company’s address in the designated field in a format that the navigation system can recognize (street, house number, city, country (optional)).
This address will be used when selecting your company as the departure point (start of the route).
2) Enter your Google Maps API token.
When using the test (demo) version, you don’t need to enter a Google API token if the number of entities is 10 or fewer. If the number exceeds this limit, you’ll need to connect your own token! We’ve simplified the app installation process so you can test it easily and without any issues!
Google’s official instructions on how to get it are here.
To successfully generate an API key, you need to create a paid Google account (a business account).
You can set limits, and as long as you don’t exceed them (see below), you won’t have to pay for the service, but you’ll still need to link a payment account.
Click the link to the Google Cloud Platform Console. Sign in with your regular Google account.
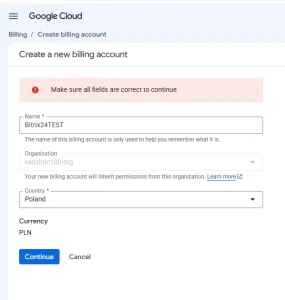
Go to the “Billing” tab, select “Manage Billing Accounts,” and then “Add billing account.”
Next, fill in the information in three steps: select your country, enter your phone number (and the verification code that will be sent to it).
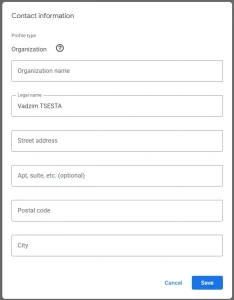
W trzecim kroku wprowadzamy dane firmy.
Można wprowadzić dane firmy, w której pracuje pracownik. Istnieje również możliwość wprowadzenia losowych wartości – system nadal będzie działał prawidłowo.
Wypełniamy pola: Dane podatnika – można wpisać numer identyfikacyjny podatnika (UNP, INN, NIP) swojej firmy lub dowolną 9-cyfrową liczbę. Po wypełnieniu klikamy „Start trial period”.
Linking (or using) a business account and a payment card is a required step to ensure the app works properly! You won’t incur any additional charges from Google as long as you stay within the free usage limits.
In the menu, select API and Services > Credentials.
Here, click “Create Credentials,” copy the generated key, and paste it into our app, then save it.
Let’s finish our configuration and click “Apply restrictions to the key.” Here, we can name the key; for “Allowed application types,” we’ll leave it set to “None”; and for “Allowed APIs,” we’ll select four options: Directions API, Geocoding API, Maps Embed API, and Maps JavaScript API.
If you don’t see these options, you’ll need to add them to the library to make them available. To do this, scroll through the menu to “Google Maps” and go to the “API” tab. Here, you’ll see all the enabled APIs that are available for integration.
Select the desired item and click “Enable.” It will then appear in the list; edit the API key that was generated.
Please be aware of the limit on free use of the Google API. If your app generates requests or displays usage volumes totaling less than $200 per month, your use will be free. You will be charged for usage that exceeds the $200 monthly credit.
Limit values are set individually for each portal, so you can set these limits as you see fit, depending on how you use the app.
You can find the allowed limits in the Google guide.
To set limits, go to the Control Panel, select a project (if you have multiple projects), select an API from the list, click the “Quotas” tab, and in the “Requests” tab, edit the limits according to the conditions above (pay special attention to the Maps JavaScript API).
The app uses Google Maps in full compliance with the Google Maps Terms of Service.
5. Next, you need to specify the fields used in your CRM to enter an address.
For example, if managers enter a customer’s address in the standard details field (or the standard “Address” field), simply select the “Details” option in the field.
The address provided in the payment details will be used to determine the customer’s location.
In this context, “standard field” means that you did not create the field yourself, but are simply using the ones that come pre-installed in Bitrix24.
If you use non-standard, custom fields (for example, your address consists of separate fields such as “Street,” “House,” “Region”) or use different fields for different entities (for example, “Details” for Companies and a set of custom fields for Deals), click “Select Fields,” specify the entity (Lead, Deal, Contact, Company) you want to configure, and select the fields that contain information about the entity’s address.
The list of fields will include both standard Bitrix24 fields and custom fields that you have created.
Configure the field selection for each entity.
Done! The initial setup is complete.
You can now launch the app from a specific Lead, Deal, Contact, or Company card, or from the “Market” tab on your portal.
“GENERAL” Tab
Company Settings – Enter your company’s address in this field.
Technical Settings – You must enter your Google Maps API token here.
Next, for each entity, you can specify which fields are visible and which are searchable.
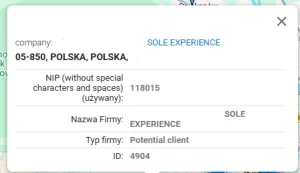
Visible fields—These are the fields whose data appears in the tooltip when you hover over a point on the map. Select an entity and add your own list of fields to be displayed in the tooltip on the map.
Types—in this section, you need to specify the fields that will be used for classification; essentially, these are the search criteria used to assign an icon to a point on the map.
Here, you can add and configure logos based on a filter.
Select the field you want to use to determine which markers will be assigned to which customers; all fields you selected in the “Search Fields” section are available.
After that, for each value, you’ll be able to add your own marker from the markers suggested by Google.
“Export” tab
“Export” tab—used to configure export settings (creating a commercial application or a file containing a list of points)
Select the entity for which you want to configure export settings.
In the “Columns” row, specify the fields from the selected entity’s card that you want to export to an Excel file.
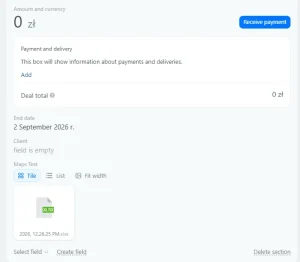
In the “Attach Files” section, you can specify a field in the card for each entity (Company, Contact, Deal, Lead) where the exported file should be saved. This way, you’ll have quick access to the export file directly from the CRM card. This feature is available when you open the app from an entity card.
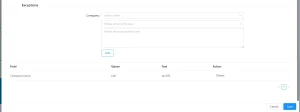
In the “Exceptions” section, you can specify fields that need to be filled out in a non-standard way. You can use this field to add a comment or note. You can also view the list of exceptions in the summary table below.
For example, suppose you want the export file to include a discount or special offer for all Lidl stores.
In that case, fill in the fields as follows:
In the export file, we’ll see information in the following format:
“Regions” Tab
The “Regions” tab is used to configure the tool for selecting areas on the map that are assigned to a specific employee.
In this tab, you can specify which portal users will have permissions to manage regions.
“Location Verification” Tab
The “Location Verification” tab is used to configure the recording of an employee’s visits (check-ins) while traveling along routes. For each entity, you can specify a field where the status of a visit to a location will be recorded (Check-in / Empty, if the employee has not yet checked in at that location). Select this field in the “Status Field” line.
Data on the check-in time and the distance at which it was made will be sent to the “Additional Information Field.”
In the “Maximum Check-in Distance” field, specify the number of meters within which an employee must be located relative to the check-in point for the check-in to be accepted successfully.
In the “Photo Field,” specify the field on the card where the photo added by the employee during check-in will be attached.
Here you can view up-to-date information regarding the data that the app displays or, for whatever reason, does not display.
You can find any entity and see why it isn’t on the map.
Likewise, if there’s a data loading error, you’ll be able to figure out the cause.
Let’s move on to using the app now that the settings are complete. We’ll start with the filters, which allow you to display locations on the map based on various criteria.
There are two ways to use the filter, each of which unlocks different features of the app.
2.1 A simple filter
This filter displays points on the map—you simply select the field containing information about the objects you want to display and enter a value. For example, you can display all stores on the map (Client Type—Stores (Clients, Partners, etc.)). You can search for locations by business type, company name, and other custom fields.
In a simple filter, it is assumed that you do not specify a radius. On the right, you will see a list of addresses from which you can create a route and submit a request.
To plan a route, follow these instructions:
Enter your starting point—your company’s address, your current location, or another address.
If necessary, you can select specific locations you want to visit by clicking on them on the map or removing unwanted ones from the list, or you can keep all the locations based on the filter you’ve applied.
Click the “Route” button.
Review the generated route and, if necessary, set a task.
Once the route is created, a main task with the specified name will be created, along with a subtask for each selected point on the route.
Employees can use these to leave comments for each point and mark tasks as completed when they visit that point.
2.2 Advanced filter with radius and export options.
After filling in the fields for the simple filter, you can specify a radius around the point found using that filter. This will open two additional fields where you can specify which objects within the specified radius should be displayed.
For example, we want to see all stores within a 5-kilometer radius of our client(s) on the map.
In the filter, you can also choose between strict and non-strict filtering (when only one field matches):
When using this type of filter:
1) The number of areas and the number of locations within those areas are displayed (for example, we have 2 customers and 30 stores within a 5-km radius of both);
2) A list of addresses for locations within a specified radius of the main (central) location is generated.
In addition, two export options are now available:
1) Download a KML file that you can upload to Google My Maps, where all the addresses in the list you created will be displayed. This feature is very convenient when you need to share the list with someone who doesn’t have a Bitrix24 account—such as clients, partners, or couriers—or simply to save the map with addresses for offline use.
2) Export the list to an Excel file (commercial offer). The fields to be exported and any exclusions are specified in the settings (see above);
3. Resource Reservations
How can I see on the map which reservations are within the manager’s area of responsibility?
These instructions can be used as an example, since the display of filtered objects depends on the portal settings and the fields you use.
1. Resources must be created; the search is based on them.
2. Enable the display of Transactions on the map.
3. Click the Filter button, select managers, add field values, and specify the radius of their area of responsibility that you want to display on the map.
4. Next, in the filter that opens below, select the “Reservation” field type and choose the resources you want to display. Here, you can also filter resources by reservation date and time.
To view a specific transaction with a reservation and assign it to a manager, in the first part of the filter (where you set the radius), you can use the “Name” field and enter the transaction name (a partial match is acceptable). Apply the filter. You’ll see the location of the transaction you’re looking for and the managers’ areas of responsibility, and you’ll also be able to visually determine which manager is best suited to handle this reservation.
What is included in basic support
Consultations on installing the application.
Assistance in matching standard CRM fields with the map.
Answers to questions about the basic logic of displaying labels (Leader — blue, Deal — purple).
Important! Your role matters not only during installation but also during application use. Administrators have access to more CRM entities than regular users. Please check with Technical Support if any of the entities available to administrators are not available to you as a regular user.
What is an additional setting (paid)
Assistance in setting up a Google Cloud account and API limits.
Integration with external systems (Webfleet and similar).
Setting up complex custom address formats.
